# Electron - 新手入門 - 做一個鬧鐘吧
這是一篇適合給新手的入門開發
### 📝 前言
這一篇算已經遲來了,
以前開發桌面應用程式都是用 [WinForm](https://en.wikipedia.org/wiki/Windows_Forms),
後來 [Electron](https://electronjs.org/) 的熱門,所以將以往自己寫的軟體重構。
只是一直忘記紀錄成文章。
這篇會從基本的開始教學,
包含如何編譯成 Windows 可執行檔([.exe](https://en.wikipedia.org/wiki/.exe)),
以及最後如何封裝起來,給別人進行安裝。
### ⏰ 展示
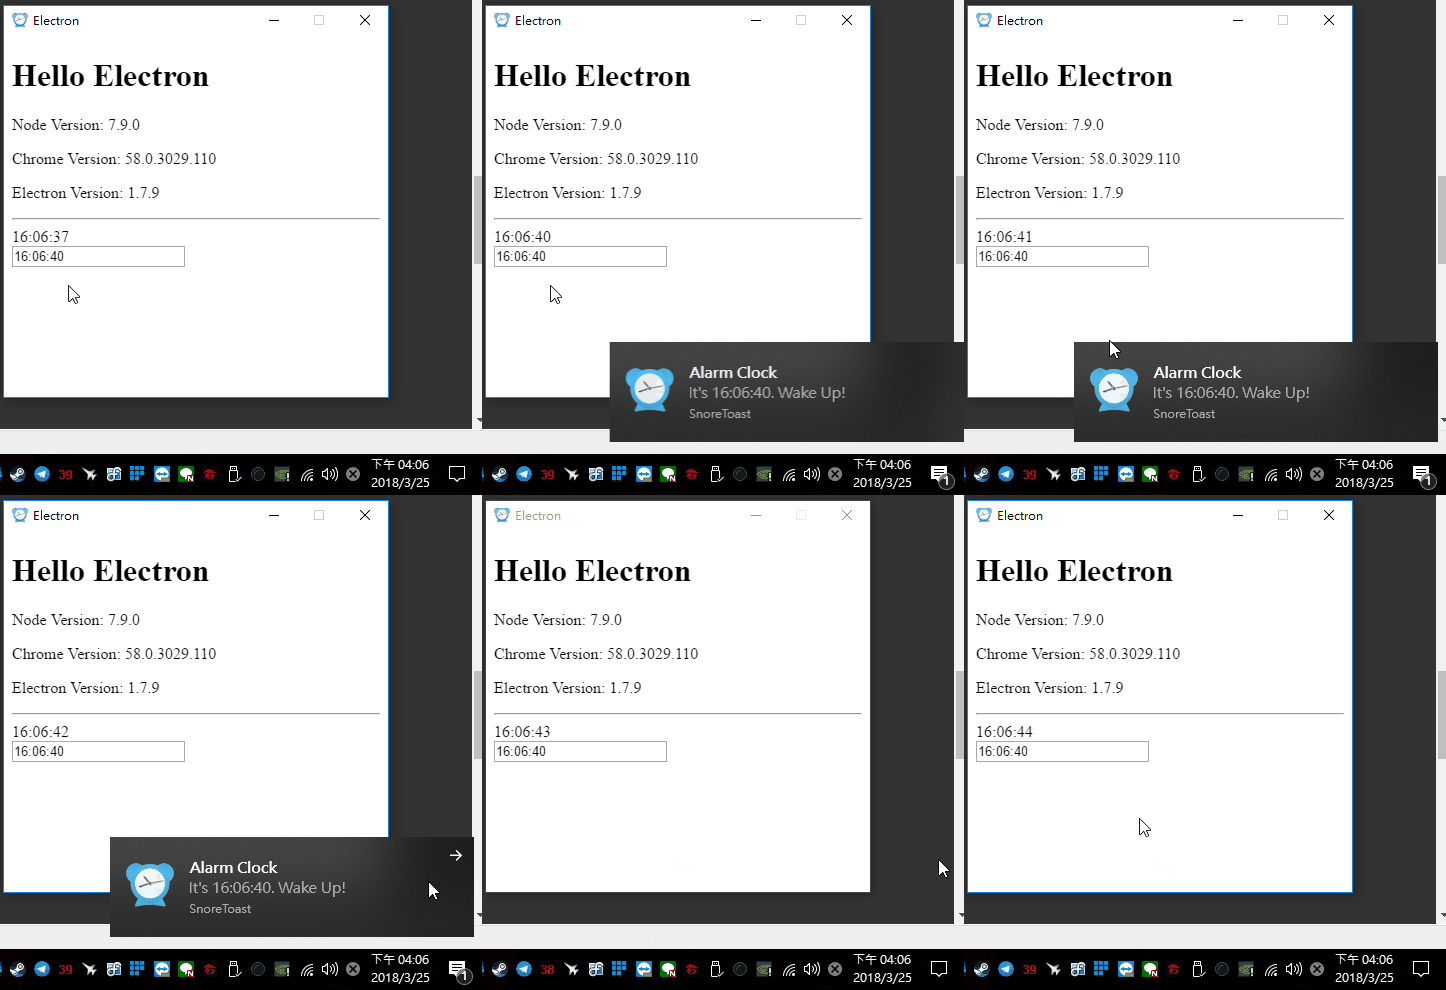
本專案將以 Windows 作為平台,開發一個桌面的通知程式,
透過指定的時間,當時間到了的時候,會在右下角提醒。
完整專案放置於 Github - [electron-alarm-clock](https://github.com/explooosion/electron-alarm-clock)
DEMO:
📚 本文目錄:
--------
1. [Electron 介紹](#1)
2. [專案建立](#2)
3. [鬧鐘提醒程式開發](#3)
4. [程式編譯](#4)
5. [程式封裝](#5)
6. [建立桌面捷徑](#6)
7. [參考資料](#7)
一、Electron 介紹
-------------
依照慣例先看一下 Logo:
[](http://blog.darkwing.co/wp-content/uploads/2016/10/atom_electron.jpg)
[Electron](https://electronjs.org/) 最早名稱為 [Atom Shell](https://electronjs.org/blog/electron),
是由 Github 所開發的開源框架,
主要是使用 [Node.js](https://nodejs.org/en/) 和 [Chromium](https://zh.wikipedia.org/wiki/Chromium) 進行 GUI 桌面 APP 開發。
由於開發環境就是基於 [Node.js](https://nodejs.org/en/),請務必安裝好。
在學習上當然就需要具備一點 Node.js 基礎,包含 [npm](https://www.npmjs.com/)、[package.json](https://docs.npmjs.com/files/package.json) 的認知與操作。
如果對 Node.js 感到陌生,推薦看這篇文章 😮:
* [2014 iT 邦幫忙鐵人賽 - Node.js 系列學習日誌 系列](https://ithelp.ithome.com.tw/users/20024110/ironman/939)(作者 [jou516](https://ithelp.ithome.com.tw/users/20024110/profile))
很多知名的桌面應用程式都是使用 Electron 開發的例如:
* [Github Desktop](https://desktop.github.com/)
* [Discord](https://discordapp.com/)
* [WordPress.com](https://wordpress.com/)
* [Visual Studio Code](https://code.visualstudio.com/)
* [Slack](https://slack.com/)
* [Atom](https://atom.io/)
關於 Electron 的小八卦
只不過原 Electron 的相關開發人員 👨🏻💻,
目前已經重構並轉移到新的專案進行開發 - [Yue](https://github.com/yue/yue) ([官網](http://libyue.com/docs/v0.1.1/js/index.html))
有空也會來熟悉下玩玩看 [Yue](http://github.com/yue/yue) 惹!
二、專案建立
------
以下實務操作將建立一個桌面鬧鐘通知應用程式,
如果對環境初始已經熟悉,可以直接 clone 官方的 [electron-quick-start](https://github.com/electron/electron-quick-start)。
首先我們建立專案資料夾,並初始化:
```bash
mkdir electron-alarm-clock && cd electron-alarm-clock
npm init -y
```
* 你可以直接手動新增資料夾,然後進入(可以不用這麼工程師的方式)
* 進入專案後使用終端機輸入 npm init -y 進行初始專案(-y 是將詢問的條件通通默認 yes)
安裝 electron:
```bash
npm install --save--dev electron
```
* \--save-dev 會將指定套件存於 package.json 的 devDependencies
* 因為 electron 只有開發階段才需要用到,因此只需要 --save--dev
修改程式進入點位置:
在 main 的部分,將 index.js 改為 main.js。
在 script 的部分,新增 start。
\[ package.json \]
```json
{
"name": "electron-alarm-clock",
"version": "1.0.0",
"description": "",
"main": "main.js",
"scripts": {
"start": "electron ."
},
"keywords": [],
"author": "",
"license": "ISC",
"devDependencies": {
"electron": "^1.8.4"
}
}
```
建立主程式,因此新增檔案 main.js:
程式說明都在註解中,就不再說明了😖~
\[ main.js \]
```javascript
const {
app,
BrowserWindow,
} = require('electron')
const path = require('path')
const url = require('url')
app.on('ready', createWindow)
app.on('window-all-closed', () => {
// darwin = MacOS
if (process.platform !== 'darwin') {
app.quit()
}
})
app.on('activate', () => {
if (win === null) {
createWindow()
}
})
function createWindow() {
// Create the browser window.
win = new BrowserWindow({
width: 400,
height: 400,
maximizable: false
})
win.loadURL(url.format({
pathname: path.join(__dirname, 'index.html'),
protocol: 'file:',
slashes: true
}))
// Open DevTools.
// win.webContents.openDevTools()
// When Window Close.
win.on('closed', () => {
win = null
})
}
```
在 main.js 中我們指定畫面來源為 index.html,
\[ index.html \]
```html
Electron
Hello Electron
Node Version:
Chrome Version:
Electron Version:
```
* 在 script 中,我們可以調用 node.js 的物件,在這邊我們範例使用 [process](https://nodejs.org/api/process.html#process_process)。
運行結果:
```bash
npm start
```
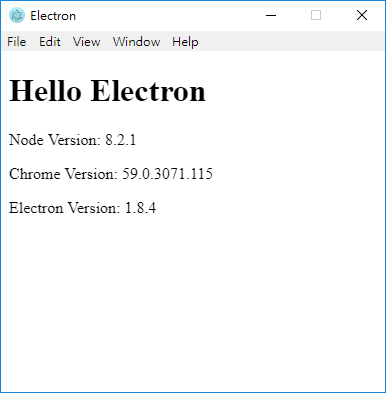
以上我們完成了基本的環境與專案建立。
三、鬧鐘提醒程式開發
----------
這邊基本上可以自行開發創作,
以下功能會進行時間的偵測,並透過 [Notification](https://developer.mozilla.org/zh-TW/docs/Web/API/notification) 進行提醒。
### 元素布置
首先放置「顯示當前時間的元素」、「可輸入時間的輸入方塊」,
以及載入畫面端主程式 app.js
```html
Electron
Hello Electron
Node Version:
Chrome Version:
Electron Version:
```
### 顯示時間並不斷地更新
在時間操作上,我們使用套件 [moment.js](https://momentjs.com/) ⏱,比較方便操作。
```bash
npm install --save moment
```
\[ app.js \]
```javascript
const moment = require('moment')
const elNow = document.querySelector('.now-time')
const elAlarm = document.querySelector('.alarm-time')
elAlarm.addEventListener('change', onAlarmTextChange)
let time = moment()
let nowTime
let alarmTime
/** Set Time */
const now = moment(time).format('HH:mm:ss')
nowTime = now
elNow.innerText = now
const alarm = moment(time).add(5, 'seconds').format('HH:mm:ss')
alarmTime = alarm
elAlarm.value = alarm
timer()
/** Now Time */
function timer() {
time = moment().format('HH:mm:ss')
/** Set Now */
nowTime = time
elNow.innerText = time
setTimeout(() => {
timer()
}, 1000)
}
/**
* Save To Global Variable,
* Can't Read Dom In Minimize Status.
* @param {event} event
*/
function onAlarmTextChange(event) {
alarmTime = event.target.value
}
```
* 提醒時間:預設當前時間過後 5 秒
* nowTime:把當前時間存成全域變數
* alarmTime:把提醒時間存成全域變數
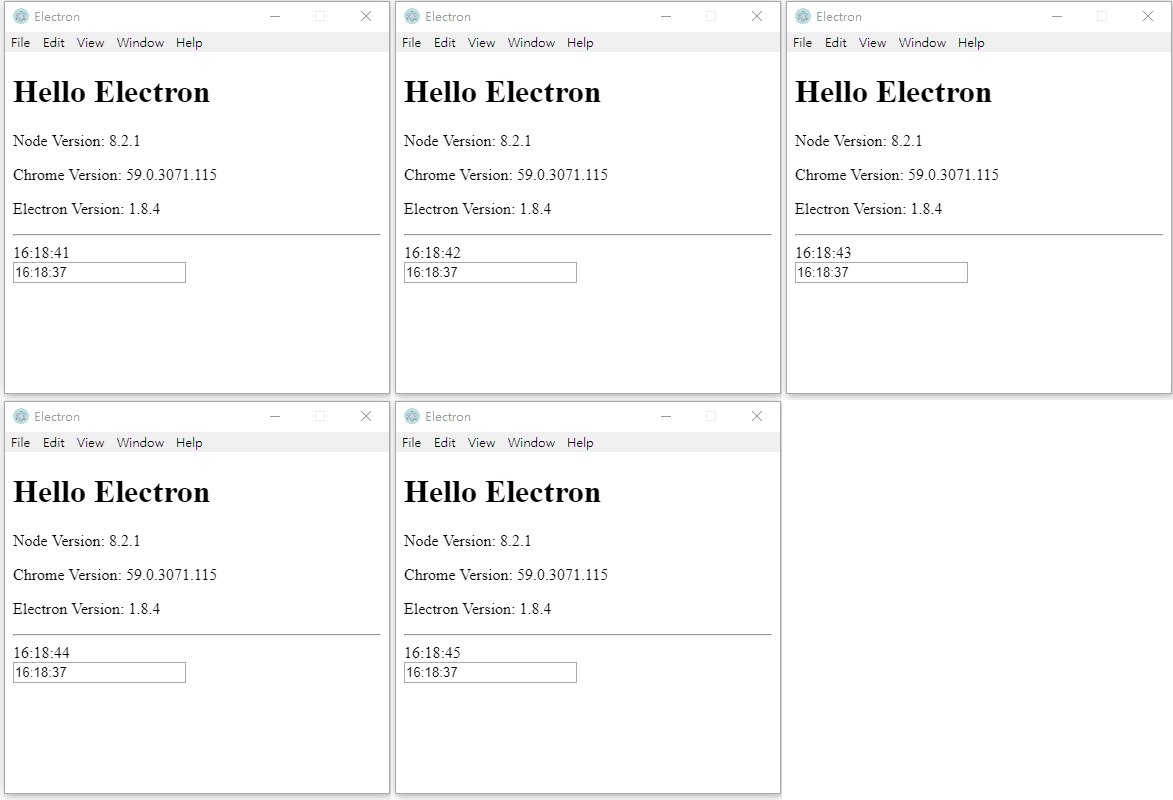
可以看到不斷地更新當前時間。
```bash
npm start
```
### 提醒時間
判斷時間如果符合提醒,就跳出通知。
\[ app.js \]
```javascript
/** Now Time */
function timer() {
time = moment().format('HH:mm:ss')
/** Set Now */
nowTime = time
elNow.innerText = time
check()
setTimeout(() => {
timer()
}, 1000)
}
/** Check Time */
function check() {
const diff = moment(nowTime, 'HH:mm:ss').diff(moment(alarmTime, 'HH:mm:ss'))
if (diff === 0) {
alert('wake up!')
}
}
```
* 在 timer 中呼叫 check
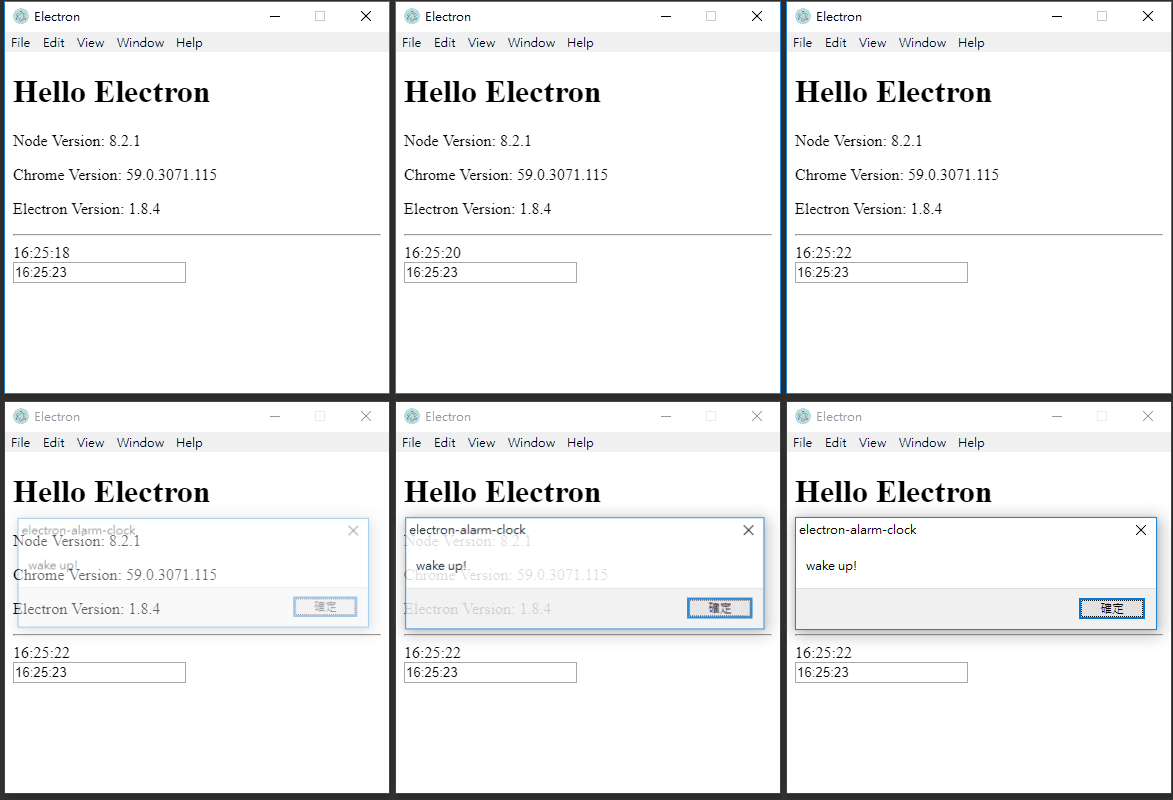
當時間到的時候,會跳出訊息。
```bash
npm start
```
### 通知訊息
通知的部分,因為在 Windows10 好像 [Notification](https://developer.mozilla.org/en-US/docs/Web/API/notification) 會有點失效問題 😪,
在這邊選用一個套件 [node-notifier](https://github.com/mikaelbr/node-notifier) 來進行通知。
```bash
npm install --save node-notifier
```
\[ app.js \]
```javascript
const notifier = require('node-notifier')
const path = require('path')
```
```javascript
/** Check Time */
function check() {
const diff = moment(nowTime, 'HH:mm:ss').diff(moment(alarmTime, 'HH:mm:ss'))
if (diff === 0) {
const msg = "It's" + alarmTime + ". Wake Up!"
/** const msg = `It's ${alarmTime}. Wake Up!` */
notice(msg)
}
}
/**
* System Notification
* @param {string} msg
*/
function notice(msg) {
/** https://github.com/mikaelbr/node-notifier */
notifier.notify({
title: 'Alarm Clock',
message: msg,
icon: path.join(__dirname, 'clock.ico'),
sound: true,
})
}
```
系統通知的圖片使用 \[ clock.ico \],請[搜尋](https://www.google.com.tw/search?q=clock+ico&source=lnms&tbm=isch&sa=X&ved=0ahUKEwj17KS0iofaAhWKa7wKHUkcCJsQ_AUICigB&biw=1920&bih=949)圖片來用吧,
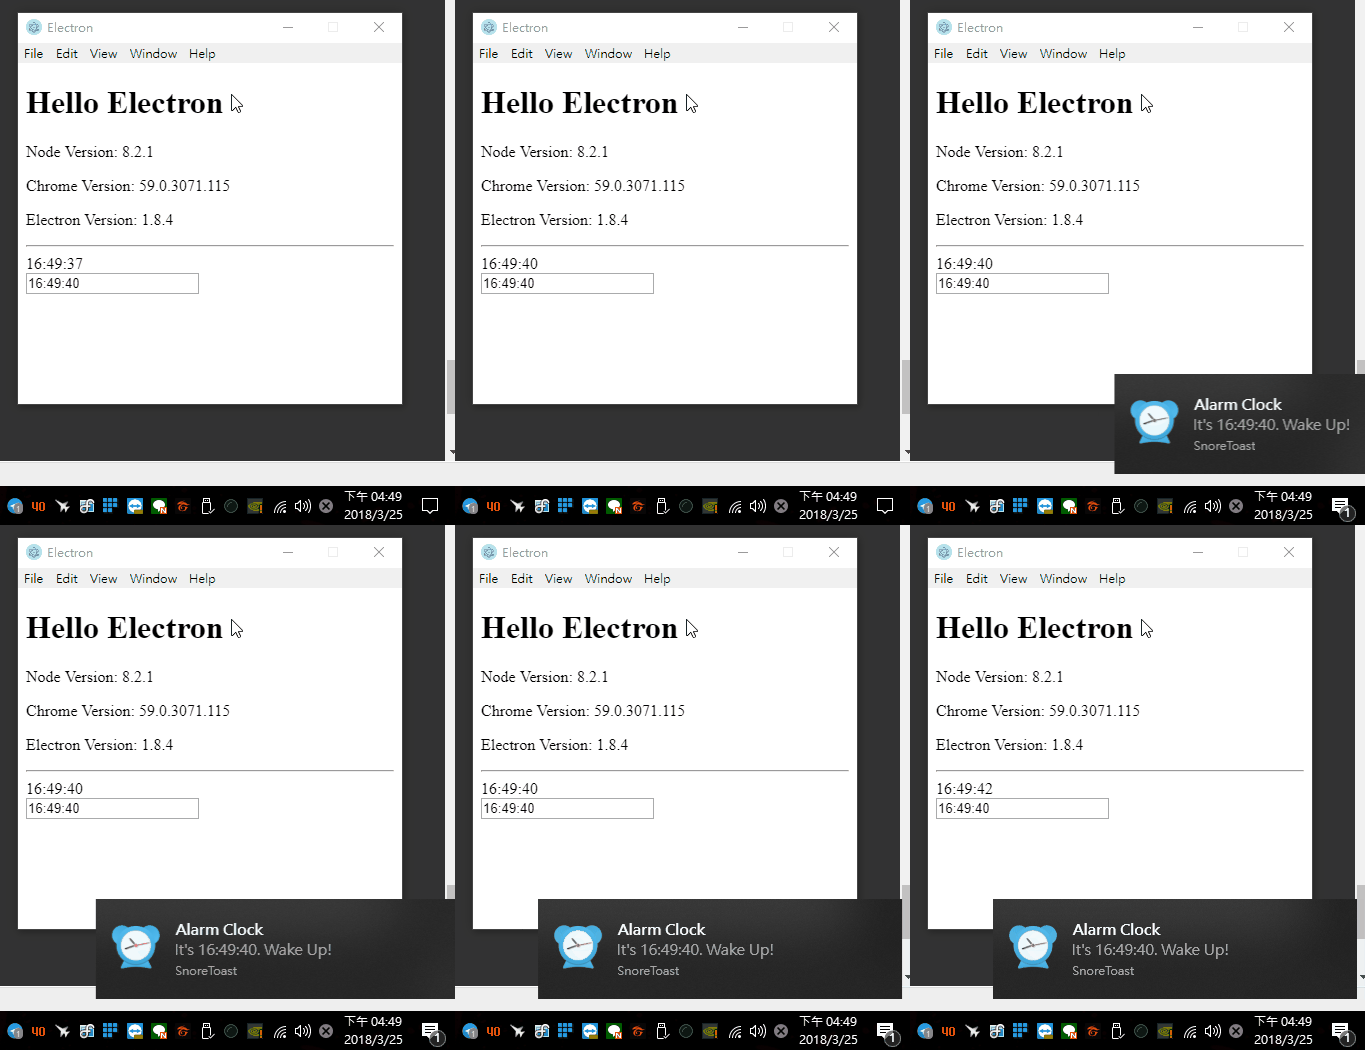
當時間到的時候,右下會發出系統訊息。
### 系統顯示在系統匣
如果要讓系統顯示於右下系統匣,需要使用 Menu、Tray。
\[ main.js \]
```javascript
const {
app,
BrowserWindow,
Tray,
Menu,
} = require('electron')
```
```javascript
function createWindow() {
// ...
// Create Tray
createTray()
}
function createTray() {
let appIcon = null
const iconPath = path.join(__dirname, 'clock.ico')
const contextMenu = Menu.buildFromTemplate([{
label: 'AlarmClock',
click() {
win.show()
}
},
{
label: 'Quit',
click() {
win.removeAllListeners('close')
win.close()
}
}
]);
appIcon = new Tray(iconPath)
appIcon.setToolTip('Alarm Clock')
appIcon.setContextMenu(contextMenu)
}
```
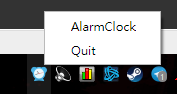
可以看到出現在系統匣,而且也有選單。
### 畫面縮小時隱藏
\[ main.js \]
```javascript
function createWindow() {
// ...
// When Window Minimize
win.on('minimize', () => {
win.hide()
})
// Create Tray
createTray()
}
```
* 在 [BrowserWindow](https://wizardforcel.gitbooks.io/electron-doc/content/api/browser-window.html) 中,利用 hide 就可以隱藏表單。
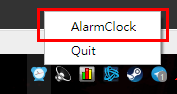
縮小的時候,再點選系統匣的 AlarmClock,就可以顯示。
### 提醒的時候顯示表單
如果已經隱藏表單,希望於鬧鐘響的時候顯示表單,
就需要用到 [remote](https://wizardforcel.gitbooks.io/electron-doc/content/api/remote.html),才能從渲染層到主程式 main.js 進行通訊。
\[ app.js \]
```javascript
const remote = require('electron').remote
```
```javascript
/**
* System Notification
* @param {string} msg
*/
function notice(msg) {
/** Show Form */
const window = remote.getCurrentWindow()
window.restore()
window.show()
/** https://github.com/mikaelbr/node-notifier */
notifier.notify({
title: 'Alarm Clock',
message: msg,
icon: path.join(__dirname, 'clock.ico'),
sound: true,
})
}
```
* 當觸發 notice 的時候,利用 getCurrentWindow 取得當前表單
* 這裡的 window.show() 等於從 main.js 進行 win.show()
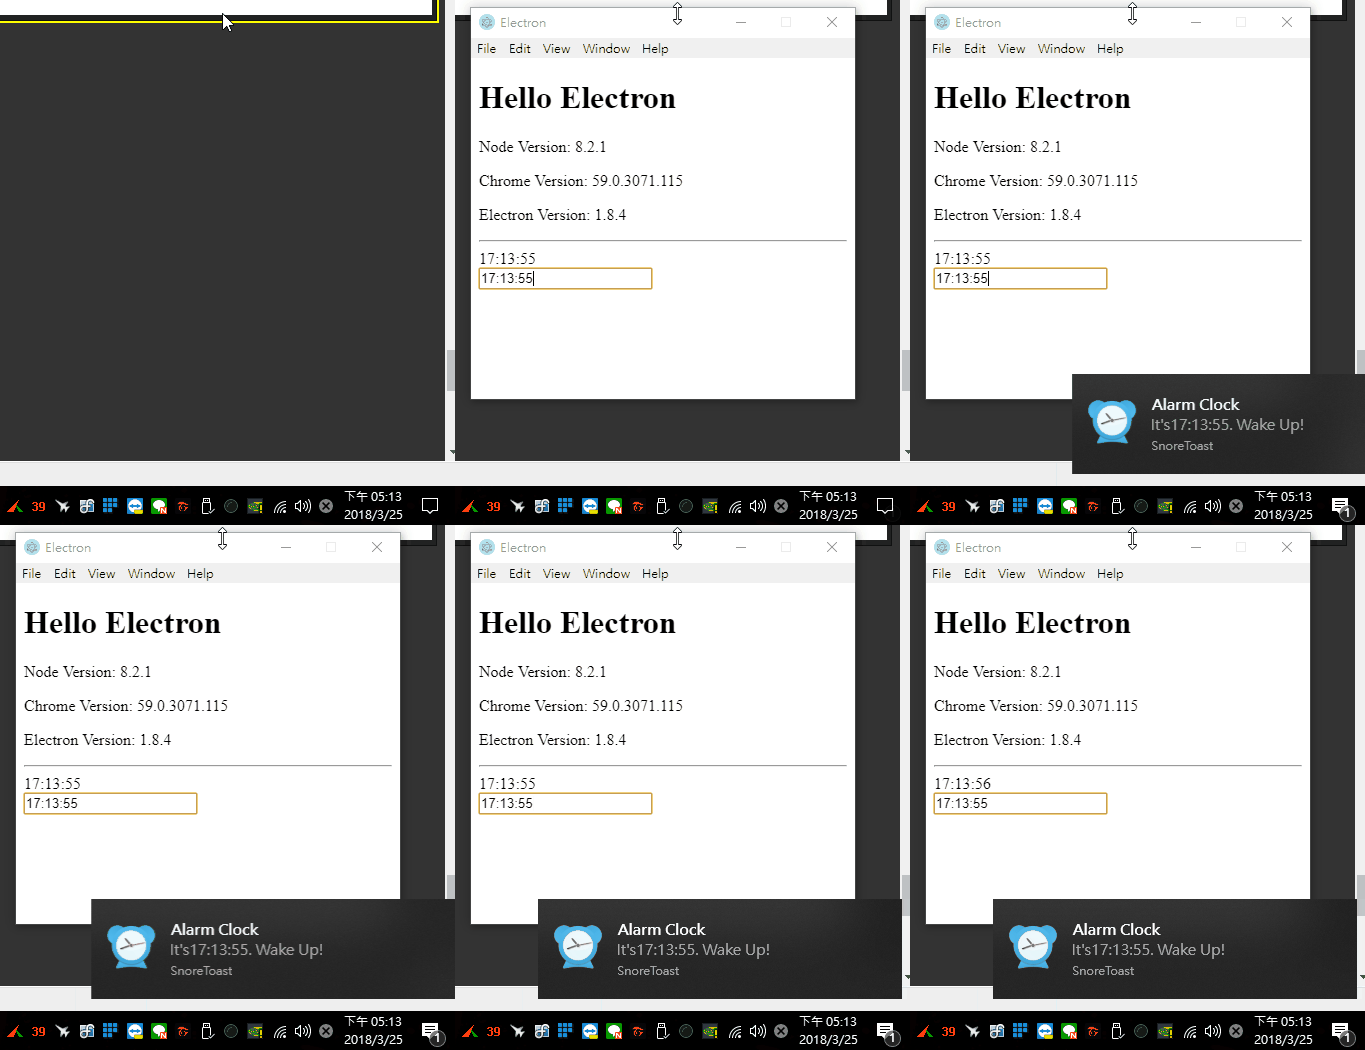
鬧鐘響時,表單從隱藏變成顯示。
四、程式編譯
------
將程式編譯成 exe,我們使用 [electron-packager](https://github.com/electron-userland/electron-packager),
在 package.json 中,新增封裝指令 build:
```bash
npm install electron-packager --save-dev
```
\[ package.json \]
```json
{
"scripts": {
"start": "electron .",
"build": "electron-packager . AlarmClock --out AlarmClock --overwrite --platform=win32 --arch=x64 --icon=clock.ico --prune=true --squirrel-install --ignore=node_modules/electron-* --electron-version=1.7.9 --ignore=AlarmClock-win32-x64 --version-string.CompanyName=Robby --version-string.ProductName=AlarmClock",
},
}
```
* electron-packager . AlarmClock:把當前目錄 . 打包起來,並將應用程式命名 AlarmClock
* \--out AlarmClock:輸出資料夾於 AlarmClock,產出後預設資料夾為 AlarmClock-win32-x64
* \--overwrite:如果已經存在資料夾和檔案,會進行覆寫
* \--platform=win32:平台為 Windows(Mac: darwin, Linux: linux)
* \--arch=x64:應用程式 64位元(ia32, all)
* \--icon=clock.ico:應用程式 ICON
* \--ignore=node\_modules/electron-\*:忽略的檔案
* \--electron-version=1.7.9:electron 的核心版本
* \--version-string.CompanyName=Robby:軟體公司名稱(顯示於軟體資訊中)
* \--version-string.ProductName=AlarmClock:軟體名稱(顯示於軟體資訊中)
試著編譯看看。
```bash
npm run build
```
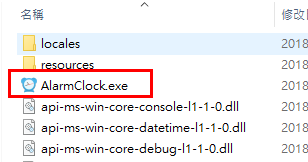
應用程式就可以直接執行了!
五、程式封裝
------
如果想將程式封裝起來,變成安裝版,
這裡分享一個套件 [grunt-electron-installer](https://github.com/electron-archive/grunt-electron-installer),
由於該封裝工具是透過 [grunt](https://gruntjs.com/) 運行,所以一併安裝。
```bash
npm install --save-dev grunt
```
```bash
npm install --save-dev grunt-electron-installer
```
在根目錄中建立檔案。
\[ Gruntfile.js \]
```javascript
var grunt = require('grunt');
grunt.config.init({
pkg: grunt.file.readJSON('./AlarmClock/package.json'),
'create-windows-installer': {
ia32: {
appDirectory: './AlarmClock/AlarmClock-win32-x64',
outputDirectory: './AlarmClock/installer64',
authors: 'Robby',
title: 'AlarmClock',
exe: 'AlarmClock.exe',
description: 'alarm clock',
noMsi: true,
loadingGif: 'clock.ico',
setupIcon: 'clock.ico',
icon: 'clock.ico',
}
}
})
grunt.loadNpmTasks('grunt-electron-installer');
grunt.registerTask('default', ['create-windows-installer']);
```
* AlarmClock/package.json:這個檔案等等我們在輸出的資料夾中 AlarmClock 放置
* create-windows-installer:grunt 的任務名稱
* appDirectory: 檔案來源(需要先使用 electron-packager)
* outputDirectory: 輸出資料夾
* authors: 作者
* title: 應用程式標題
* exe: 應用程式名稱
* description: 應用程式描述(可忽略)
* noMsi: 是否提供MIS檔(可忽略,預設 true)
* loadingGif: 執行時的圖片(可忽略)
* setupIcon: 安裝階段時的圖片(可忽略)
* icon: ICON圖片
\[ AlarmClock / package.json \]
接著到輸出資料夾的地方建立 package.json 軟體資訊。
```json
{
"name": "AlarmClock",
"version": "1.0.0"
}
```
* name:軟體名稱
* version:軟體版本
如果怕混淆,在AlarmClock 中的 package.json 是可以改名的,請注意 Gruntfile.js 所指定的檔名
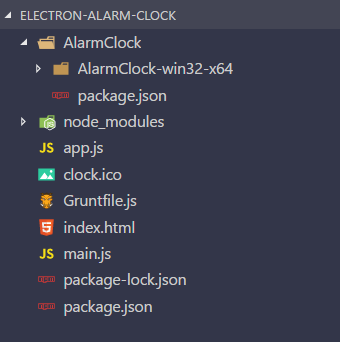
檔案結構上如下:
接著在根的 package.json 中,新增封裝指令 pack:
\[ package.json \]
```json
{
"scripts": {
"start": "electron .",
"build": "electron-packager . AlarmClock --out AlarmClock --overwrite --platform=win32 --arch=x64 --icon=clock.ico --prune=true --squirrel-install --ignore=node_modules/electron-* --electron-version=1.7.9 --ignore=AlarmClock-win32-x64 --version-string.CompanyName=Robby --version-string.ProductName=AlarmClock",
"pack": "grunt"
},
}
```
試著封裝檔案 📦。
```bash
npm run pack
```
完成後會出現 **Done.**
[](https://dotblogsfile.blob.core.windows.net/user/incredible/1727f7ce-7c50-4b56-abf4-200dd2307a1a/1521971120_53832.png)
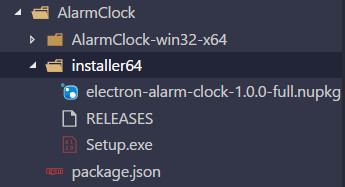
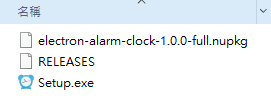
可以在輸出的資料夾 AlarmClock / installer64 看到 👀
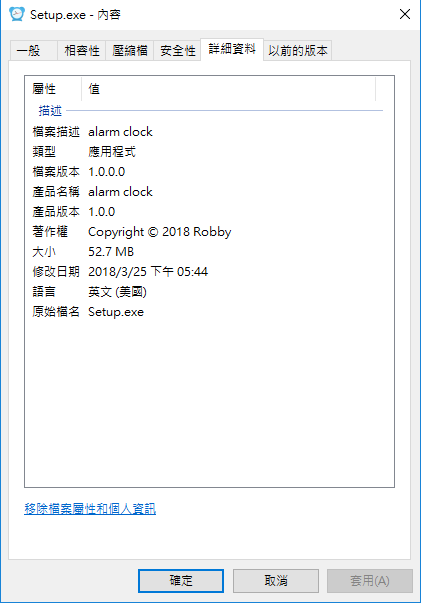
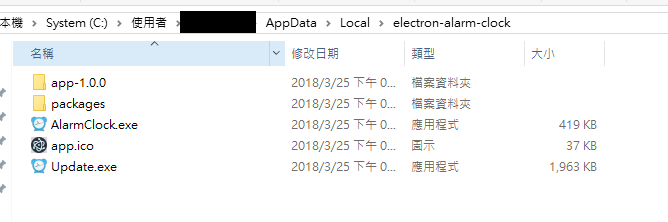
安裝後的路徑會到哪?
C:\\Users\\ { 用戶名稱 } \\AppData\\Local\\electron-alarm-clock
[](https://dotblogsfile.blob.core.windows.net/user/incredible/1727f7ce-7c50-4b56-abf4-200dd2307a1a/1521971405_28151.png)
六、建立桌面捷徑
--------
避免程式有權限的問題,預設都是安裝在 AppData / Local,
由於透過封裝的方式安裝,會發現程式的路徑太長了 😱。
避免這樣,
可以在程式安裝階段進行捷徑的建立,
並且在移除階段自動地將捷徑刪除。
\[ main.js \]
```javascript
/** Please Set To The Top */
if (handleSquirrelEvent()) {
return;
}
```
```javascript
function handleSquirrelEvent() {
if (process.argv.length === 1) {
return false;
}
const appFolder = path.resolve(process.execPath, '..');
const rootAtomFolder = path.resolve(appFolder, '..');
const updateDotExe = path.resolve(path.join(rootAtomFolder, 'Update.exe'));
const exeName = path.basename(process.execPath);
const spawn = function (command, args) {
let spawnedProcess;
try {
spawnedProcess = ChildProcess.spawn(command, args, {
detached: true
});
} catch (error) {}
return spawnedProcess;
};
const spawnUpdate = function (args) {
return spawn(updateDotExe, args);
};
const squirrelEvent = process.argv[1];
switch (squirrelEvent) {
case '--squirrel-install':
case '--squirrel-updated':
spawnUpdate(['--createShortcut', exeName]);
setTimeout(app.quit, 1000);
return true;
case '--squirrel-uninstall':
spawnUpdate(['--removeShortcut', exeName]);
setTimeout(app.quit, 1000);
return true;
case '--squirrel-obsolete':
app.quit();
return true;
}
}
```
這個方式是利用 [windows-installer](http://windows-installer),
由於它已經被封裝在 [electron-packager](https://github.com/electron-userland/electron-packager),因此不需要另外安裝,直接調用即可 😎。
完整專案放置於 Github - [electron-alarm-clock](https://github.com/explooosion/electron-alarm-clock)
七、參考資料
------
* [Electron 中文文档](https://wizardforcel.gitbooks.io/electron-doc/content/)
* [常用Electron App打包工具](https://www.jianshu.com/p/1c2ad78df208)
* [手把手教你把前端代码打包成 msi 和 exe 文件](https://juejin.im/entry/5805e39ad20309006854e58f)
* [\[Node.js\] Electron 發佈成可執行檔 APP](http://rpg1982.blogspot.tw/2015/12/nodejs-electron-app.html)
你可能會有個疑惑...
怎他媽的檔案這麼大 👎👽🤖💩🤬
--------------------
→ [The package is too big。 #2878](https://github.com/electron/electron/issues/2878)
有勘誤之處,不吝指教。ob'\_'ov